
Quick Reference Guide (v0.475)
Contents
- Running the application
- Starting a session
- Joining a session
- Camera controls
- The tabletop
- Rolling dice
- Creating a new sheet
- Editing the sheet
- Loading sheets
- Setting and moving characters
- Player status icons
- Editing sheets
- Editing a character
- Adding notes
- Macros
- Character Settings
- Map Editor
- Create a new map
- Map Editor UI
- Adding to the map
- Add floors to the map
- Stacking floors
- Add walls to a map
- Add rooms to a map
- Add decor to a map
- Add props to a map
- Add start points to a map
- Add miniatures to a map
- Editing objects
- Special edits
- Saving maps
- Loading maps
- Editing maps
- Sharing and moving maps
- On the map
- Keyboard and mouse quick reference
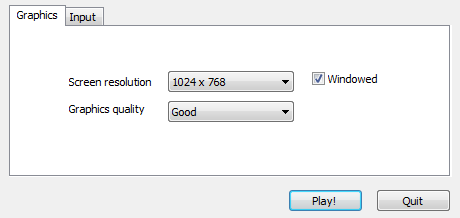
Run the application and choose your preferred screen resolution. You can choose to run in a window or in full screen. Press play when you have made your selection.
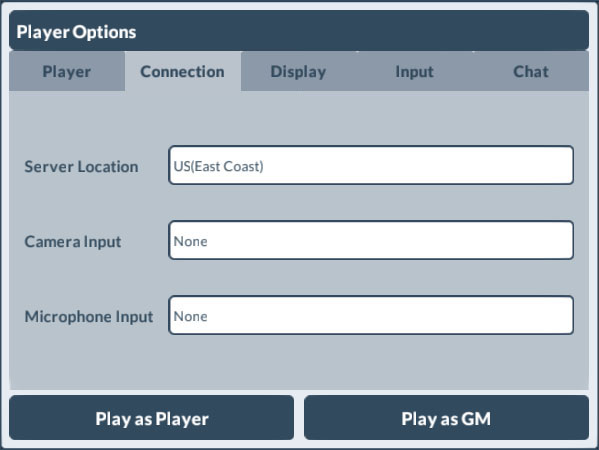
You'll find four tabs on the Player Options dialog: Player, Connection, Display, and Input.
On the Player Panel, enter your player name and choose a color. The player color will be used on the player icon and in the chat window to identify the player. It is also used as the default die color. You may also choose a player image and specify the location for the default data folder. The player image will be used in the player icon and in the chat window to identify the player. |
On the Connection Panel, choose the server location you will be connecting to. All players must be on the same server to play in the same session. The available server locations are
The camera and microphone inputs are currently unused. |
 |
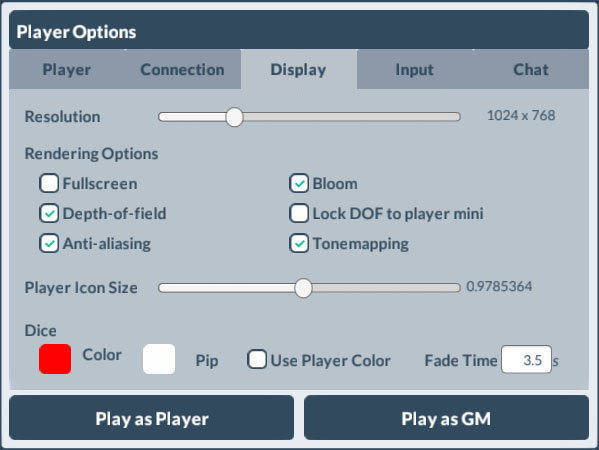
On the Display Panel, you can change your resolution and just whether to run in fullscreen. There are a number of other rendering options that are available in the map view. Use the Resolution slider to adjust the resolution of the window. The Rendering options are used to enable post effects and to toggle fullscreen mode. Use the Player Icon Size slider to adjust the size of the player icons that will be shown at the top of the screen. In the Dice section, choose how you would like you dice to appear. You can specify colors to use for the dice and the pips(numbers on the dice). Setting the Use Player Color checkbox will use the player color for the dice (with white pips). The Fade Time specifies how long, in seconds, the dice will appear on the tabletop, after they have stopped rolling, before they fade out. |
 |
|
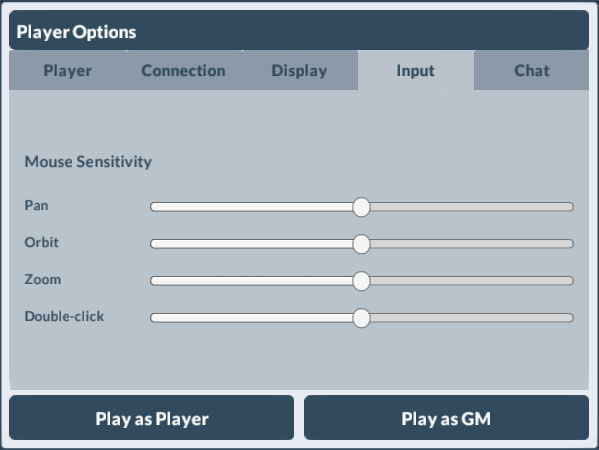
On the Input Panel, you can set the mouse sensitivity for the camera controls and set the speed of the double-click. |
 |
On the Chat Panel, change the settings for the chat logs. Set auto save log to automatically save the chat log to a file whenever you are in a session. The file name will be Chat log for [Day], [Month]-[Date]-[Year].txt and will be save to the specified directory. Auto-saved chat logs are appended onto any existing file, so all of the log entries for any session on a given day will be in the same file. Set use timestamp to include a timestamp with each entry in the log. Use the log entry prefix and suffix to set text that will be saved before and after each entry in the log. This is useful for formatting if you are inserted the log into an HTML file, for example. Use the choose chat log output folder button to set the directory auto-saved chat logs will be written to. | 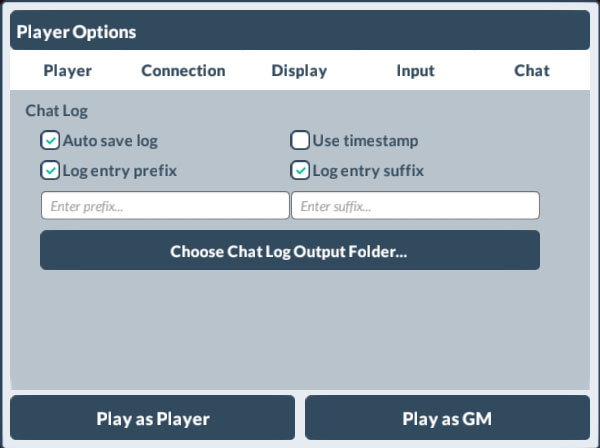 |
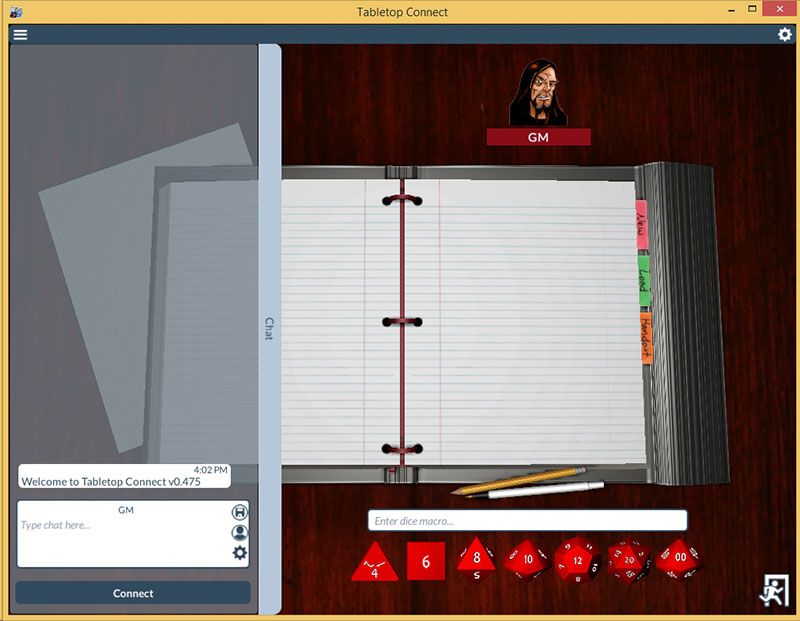
Once you have made your selections, choose whether you'll be playing as a Player or a GM by clicking the appropriate button.
To return to the Player Options dialog, click the settings icon at the top-right corner of the window.
Chat
|
Once you've made your choice, the chat blade will be revealed on the left side of the screen. Click on the edge of the blade to hide or reveal the blade. You can send messages to the other users during a session by typing into the input field at the bottom of the blade and pressing enter. Other useful messages, such as die roll results, will appear in the chat area. |
 |
Chat Aliases
|
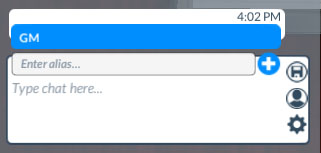
To send chat messages using an alias, click on the player name at the top of the chat input area. |
 |
|
In the pop-up menu, enter a new name and press the "+" button. |
|
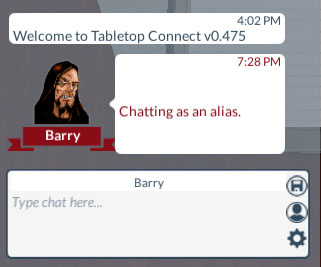
You will now be chatting using the alias. |
|
Enter a chat message and notice that the name displayed in the chat panel is the alias. |
 |
|
To switch an existing alias, click on the name again and choose a name. |
 |
Chat Filters
|
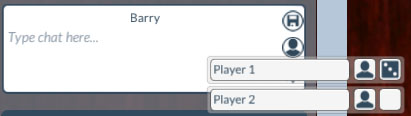
Click on the player silhouette in chat input area to filter who receives chat messages from you. Next to each player name in the pop-up there are two toggleable icons. If the silhouette icon is set, that player will receive chat messages from you. If the die icon is set, that player will receive your die rolls. |
 |
Chat Settings
|
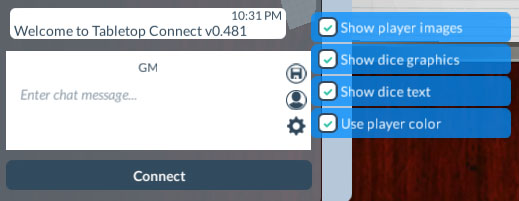
Click on the settings gear in the chat input area to change the format of the messages in the chat window. |
 |
|
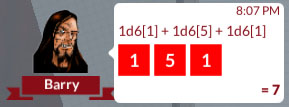
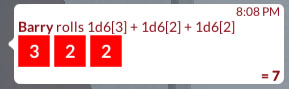
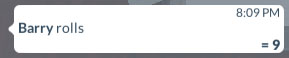
With all the options active, you'll see a the player's icon displayed with their name (or chat alias) displayed beneath. You'll also see a time stamp. For die rolls, you will see the individual die rolls (as text and graphics) and the total result of the roll. |
 |
|
With "show player images" disabled, the player icon will not be displayed and the player name (or chat alias) will be displayed as part of the chat message. |
 |
|
With "show dice graphics" disabled, the graphical representation of the dice will not be displayed. |
 |
|
With "show dice text" disabled, only the die roll result will be displayed. |
|
With "show player color" disabled. All chat messages will be displayed using the default color. |
 |
Connecting to the server
|
At the bottom of the chat blade, you'll find the Connect button. Before starting or joining a session, you'll need to connect to the server. |
|
As the GM, press the Start Session button on the bottom of the chat blade. |
|
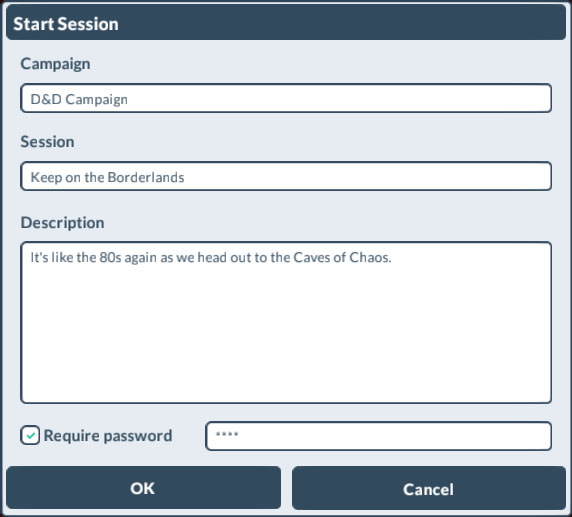
In the Start Session dialog, enter a name for your campaign, a session title, and a description. If you'd like to password protect your session, so only your players may join, select the Use Password checkbox and enter the password. Press OK to start the session. |
 |
|
Press the Join Session button on the bottom of the chat blade. |
|
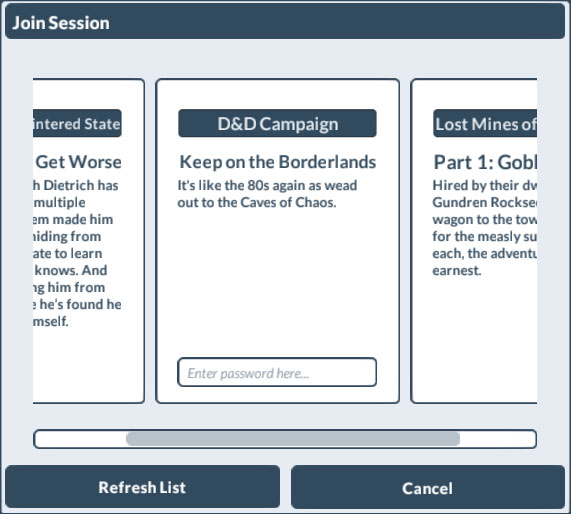
In the Join Session dialog, look for the session you'd like to join. Use the scroll bar at the bottom to scroll through the list of sessions. Once you've located your session, press the title button to join. If a password is required, enter it in the password field. |
 |
Orbit - ALT (Option) + mouse or right-mouse button
Move - SPACEBAR + mouse or middle-mouse button
Zoom - CTRL (Control) + mouse or Mouse wheel
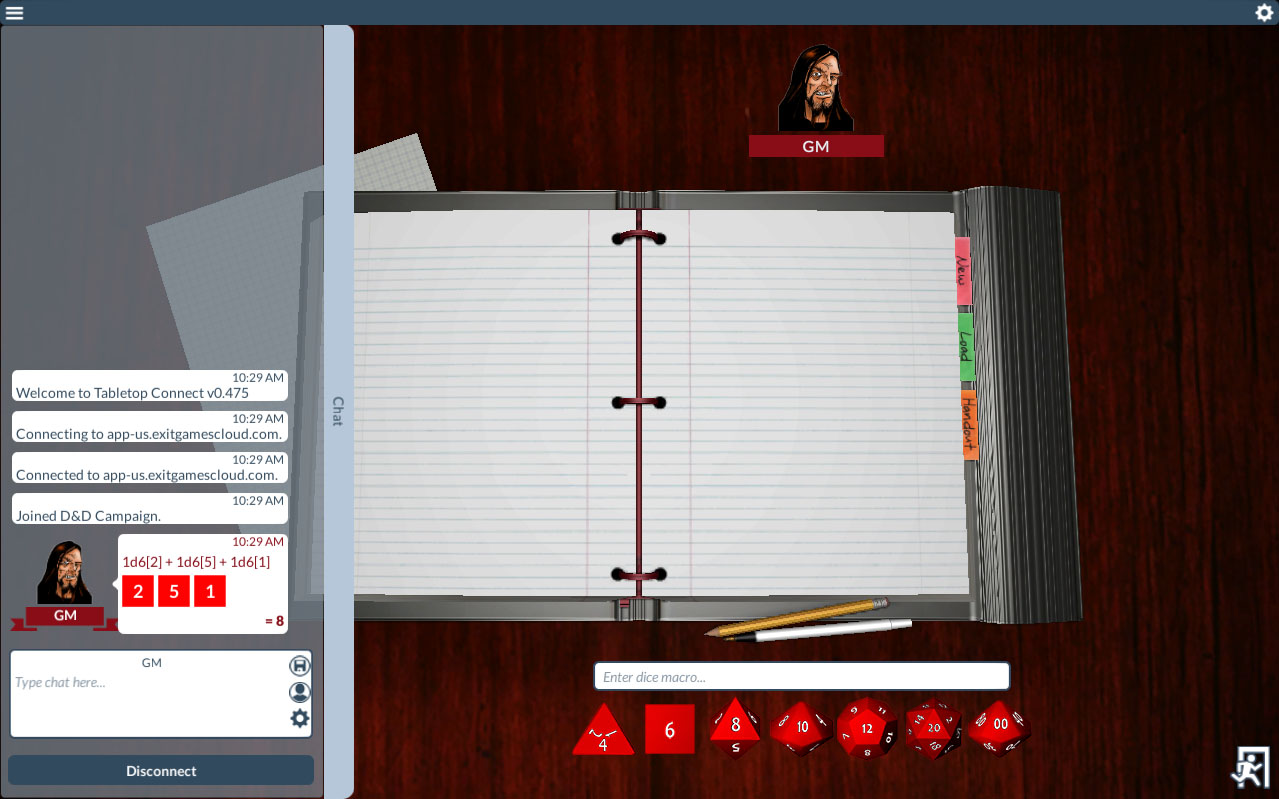
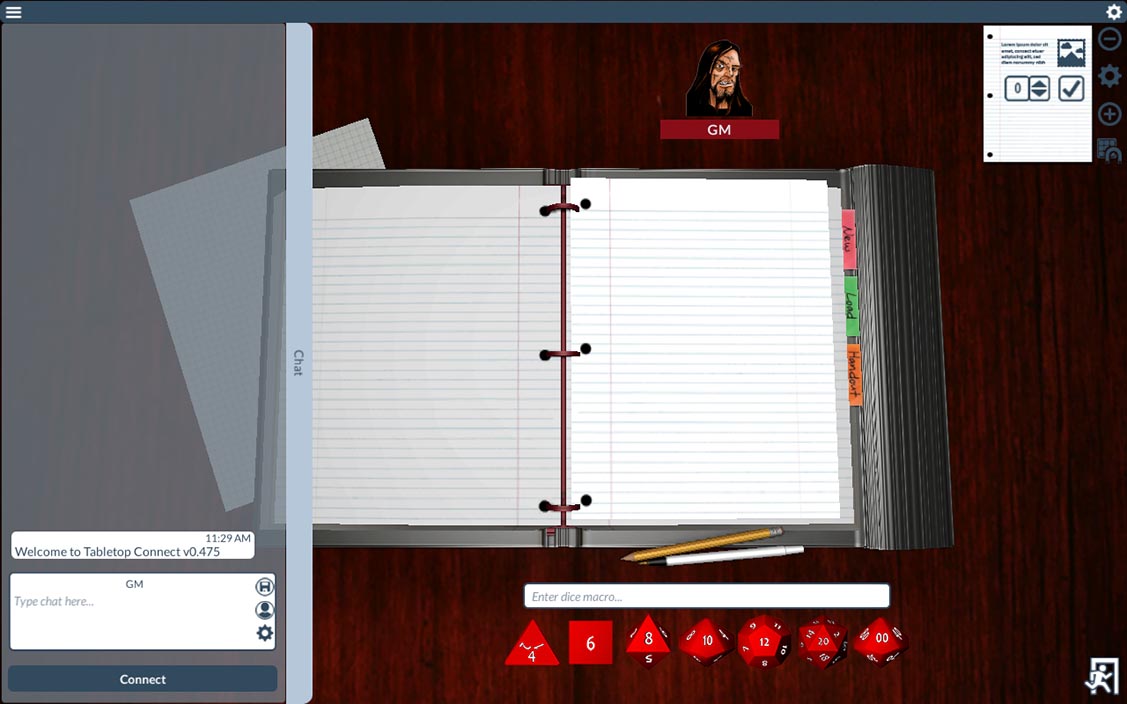
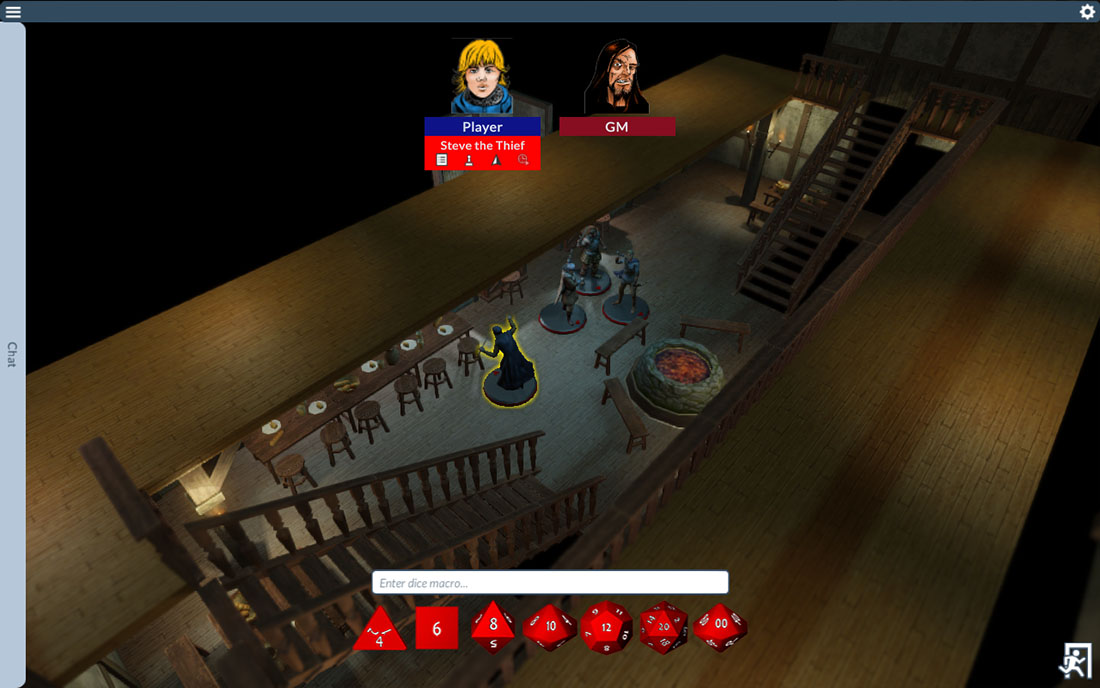
Player Icon
The GM and each player in a session will have an icon.
Map Page
Click on the blank graph paper to create or load a map.
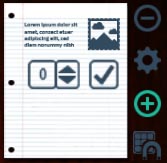
New Tab
Click to create a new sheet.
Load Tab
Click to load a sheet or character.
Handout Tab
Click to create a quick handout.
Pen and pencil
Click (or press CTRL+P) to edit character sheets.
Exit button
Quit Tabletop Connect (or switch to tabletop from map view).
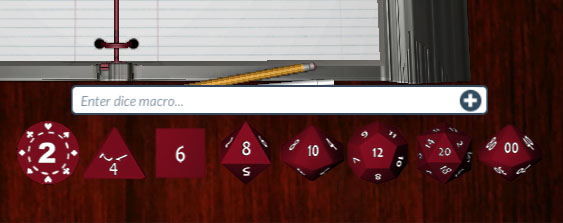
Dice Bar
Click the dice, or enter a dice macro, to roll dice.
Chat Input
Type chat messages, change chat aliases, and set chat options.
Adding dice
|
Click on the die-type on the dice bar at the bottom of the screen. The die to be rolled will appear above the dice bar. Repeat to add additional dice. |
 |
|
Hold the - to add a subtractive die. Hold the * to add a multiplicative die. Hold the / to add a division die. The order of operations is the order in which the dice are added. |
 |
To remove dice from a die roll, click on the small die icon above the dice bar.
|
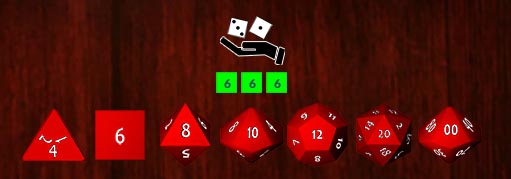
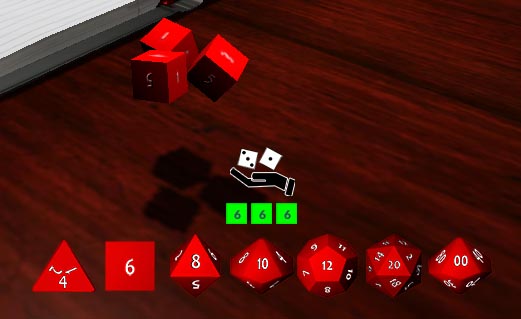
Click on the roll dice button (the hand shaped button above the dice bar) to shake the dice. The dice appear spinning above the tabletop. To throw the dice, click with the mouse or press the enter key. The roll result will be logged in the chat display. |
 |
Dice Macros
|
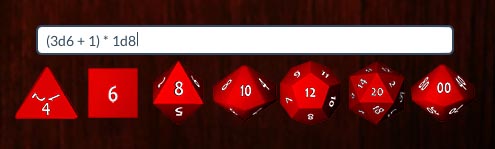
Alternatively, the die roll can be entered into the dice macro field, for example: (3d6 + 1) * 1d8. Pressing enter will "shake" the dice (the dice appear above the tabletop). To throw the dice, click with the mouse or press the enter key. The die roll is evaluated as JavaScript, so order precedence is used in dice macros. The roll result will be logged in the chat display. |
 |
|
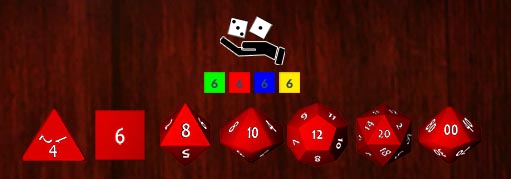
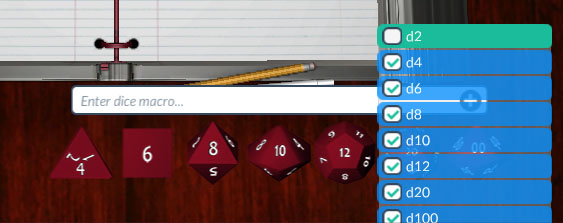
To add or remove dice types from the dice bar. Click on the plus button in the dice macro input field. In the pop-up menu, toggle the checkboxes to set which dice are available in the dice bar. |
 |
|
New dice types will add an icon the dice bar. Dice that are unset will be removed from the dice bar. |
 |
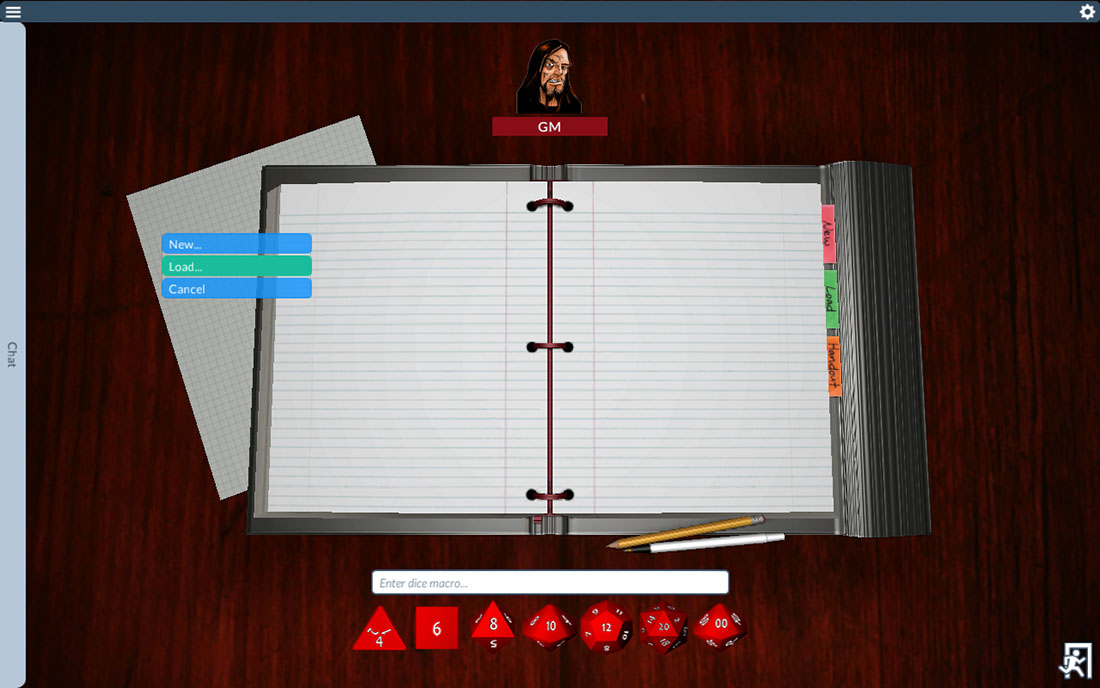
Press the new tab on the notebook to create a new sheet.
|
In the new sheet dialog, choose a page size and a background image. There are several presets sizes: letter, legal, A4, and index card. Each of these presets includes an appropriate background image. If you'd like a custom image, press the Choose Background Image button. Use the trash button to remove an existing background image. |
 |
When you are satisfied with your choices, press the OK button. A new blank page is created.
|
In the new sheet dialog, choose a page size and a background image. There are several presets sizes: letter, legal, A4, and index card. Each of these presets includes an appropriate background image. If you'd like a custom image, press the Choose Background Image button. Use the trash button to remove an existing background image. |
|
Click on the Pen or Pencil (or press CTRL + P to enter sheet editing mode. Edit mode is indicated by the Sheet UI in the upper-right corner and by the pen mouse cursor when hovering over a sheet.
Adding textboxes to the sheet
|
To add textbox, click on the textbox icon on the Sheet UI. The text icon will be highlighted in light blue. Then click on the sheet where you would like to place the text. Text elements are aligned to the bottom-left corner of the element. |
|
Click-and-drag on the sheet to define the area of the textbox. A gray box will be draw to indicate the size. |
 |
|
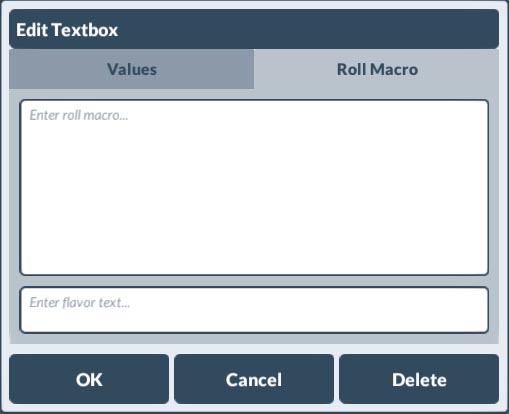
You will be presented with the Edit Textbox dialog. Text will appear on the sheet and you will presented with the Edit Text dialog. Enter the name for the field, for example, STR or AttackBonus. This name needs to be unique. You will be warned if it is not. The name will be used in macros to refer to this value. Check the lock setting if you would like this element to be un-editable on the character sheet. This is useful creating labels, or for locking an element that is a derived value (calculated from other values) and should not be directly edited. Enter default text. This is the text that will appear on the blank sheet and usually editable by the player. |
 |
|
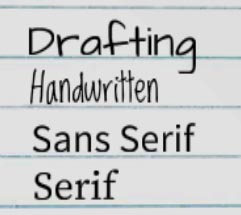
In the drop-down font menu, choose the font: Drafting, Handwritten, Sans Serif, or Serif. In the style section, choose the color and any style: bold, italic, underline, lowercase, uppercase, or small caps. Set the alignment type:left, center, right, and justified. Also set the the vertical alignment: top, middle, or bottom. Use the size slider to adjust the size of the display text. Set the overflow checkbox prevent the text from being clipped by the size of the textbox. |
 |
|
On the the Roll Macro tab you can assign a macro to text elements. This allows you to assign a die roll to text element. Text in the flavor text box with be displayed in the chat window when rolled. See the macro section for more details. |
 |
When satisfied with the field, press OK.
|
To add numbers to a sheet, click on the number icon on the Sheet UI. |
 |
|
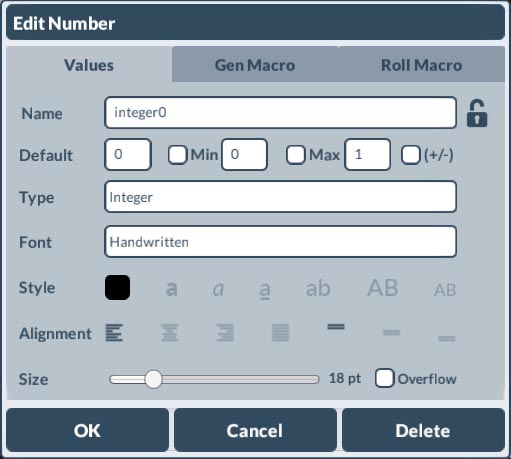
Add a number to the sheet by dragging a region, as when adding a textbox The number field has the same settings a textbox, however, the default text is replaced replaced with a default value. Optionally, you may specifiy a minimum and maximum value. If the modifier checkbox (+/-) is set, positive values on the sheet will be prefaced by a plus. In the type drop-down, you may specify whether the number is an integer (whole number) or a decimal. |
 |
|
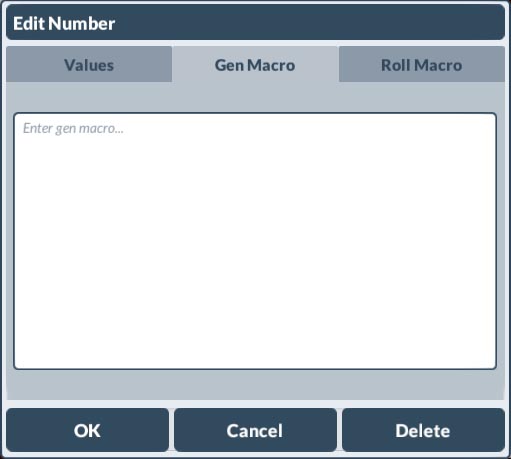
On the the Gen Macro tab you can assign a macro that generates the value from either a die roll, a formula, or a combination of both. See the macro section. |
 |
|
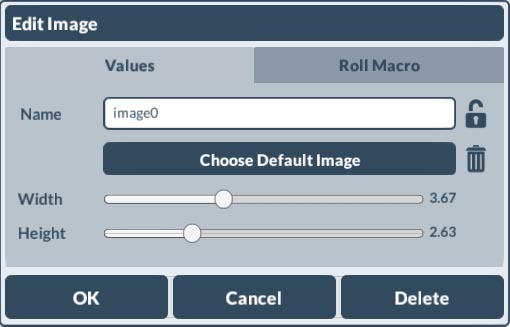
To add images to the sheet, click the image icon on the Sheet UI. |
|
Add a image to the sheet by dragging a region, as when adding a textbox You may specify a default image by pressing the Choose Default Image button. The width and height sliders may be used to adjust the size of the image. |
 |
Adding checkboxes to the sheet
|
To add a checkbox to the sheet, click the checkbox icon on the Sheet UI. |
|
Add a checkbox to the sheet by dragging a region, as when adding a textbox. Set the checkbox type to round, square, or ticked. Round and square describe the shape. Ticked is a square checkbox filled with an X. Set the checked option to specify the default state of the check box. Set the show box option to specify whether or not to display the border on the sheet. Use the color swatch to set the color of the checkbox. |
|
While in edit mode (the pen tool), hover the mouse over any element and the edit UI will appear. Click-and-drag the top-left anchor to move the element. Click the center anchor to bring up the edit dialog. Click-and-drag the bottom-right anchor to scale the element. |
 |
To exit editing mode, press the ESC key, or click the pen.
When in sheet editing mode, elements can be copied by holding the shift-key and click-and-dragging the move anchor in the top left.
|
When in sheet editing mode, add a page to the sheet by pressing the (+) icon. Similarly, you can remove and existing sheet by pressing the (-) icon. Alternately, you can click on the page (when not in editing mode) and choose add or remove page in the pop-up menu. |
 |
|
A sheet with more than one page will display tabs on the right edge. |
 |
|
To switch between pages, click on a tab. |
 |
|
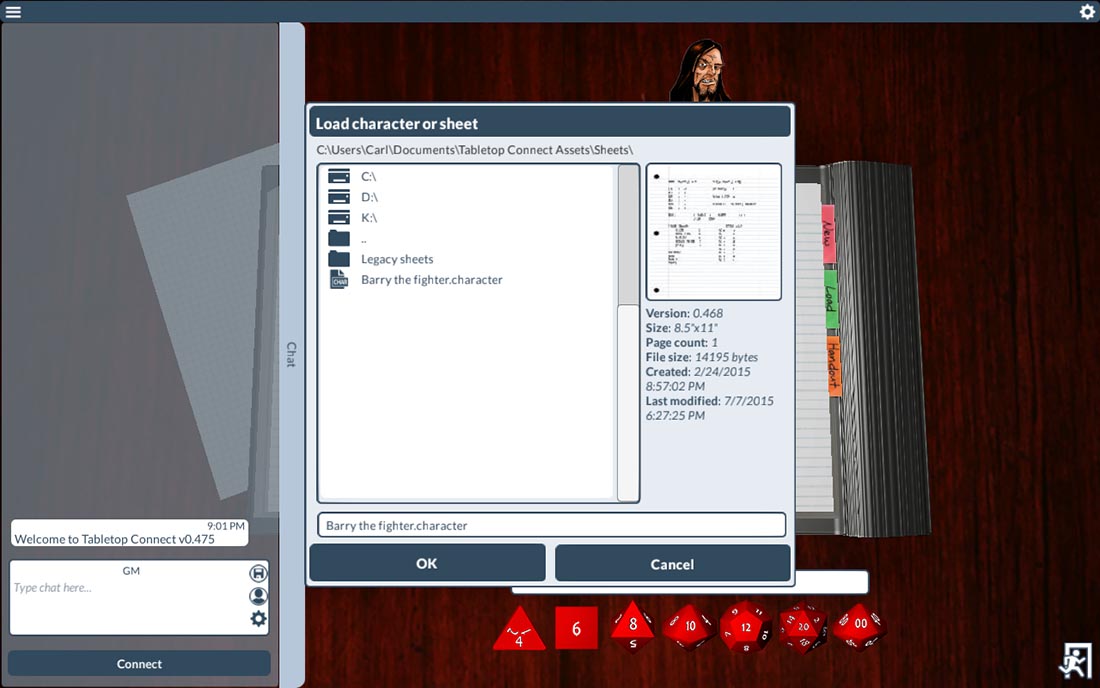
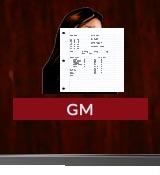
To load a sheet or existing character, click the Load tab on the notebook. In the file browser choose a sheet or character file. Information about the file will be displayed on the right side along with a preview image of the sheet. The sheet will be loaded on to the right page of the notebook. |
 |
Setting a sheet as a character
|
To set a sheet as a character, drag the sheet and drop it on your player icon. Dragging the sheet will change the mouse cursor to a preview of the sheet. |
 |
|
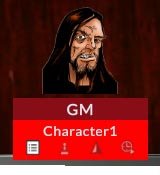
When you drop the sheet on your player icon, a character entry will be added to your player icon. |
 |
|
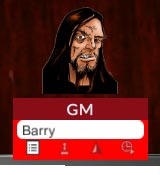
To set the name of the character, click on the character name and enter the desired name. |
 |
|
Press enter to set the new name as the character name. Using this method, you can add multiple characters. |
 |
When a sheet is shared with a player, the sheet will appear on their tabletop to the top of the notebook. When a character is set by a player, the sheet is automatically shared with the GM.
Dropping the sheet on the tabletop will drop the sheet to that location. Dropping the sheet on either side of the notebook will add the sheet to a sorted stack on that side of the notebook.
|
Below the character name are four buttons
|
|
Click and hold anywhere on the sheet to reveal the pop-up menu for the sheets:
Sheets that have multiple pages will also have a menu item to remove the current page. If the sheet is not used as a character, the menu item "Save character..." will not appear. |
 |
|
To edit values on a character sheet, click on the sheet. The pencil cursor will indicate that a sheet is ready for editing. Hover the mouse over the element you want to edit. The edit UI will appear under the mouse, and will vary depending on the element type. |
|
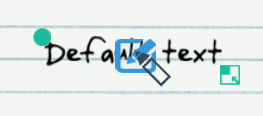
When the mouse cursor is over a textbox, the cursor will switch to an i-beam. To edit a textbox, click where you'd like to edit and a blinking i-beam will indicate the edit point. You may use the arrow keys to move the cursor. The HOME key sets the cursor to the beginning of the line. CTRL + HOME sets the cursor to the beginning of the textbox. The END key sets the cursor to the end of the line. CTRL + END sets the cursor to the end of the textbox. CTRL + DEL will clear all of the text. |
 |
|
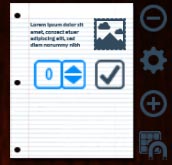
When the mouse cursor hovers over a number field, the number edit UI will appear. Modify a numeric field by clicking on the up or down arrows. Or, type a new value into the text block. Either press Numpad Enter, or move the mouse off the text block, to end the edit. For decimal values, the amount incremented/decremented with the arrows is equal to the number of demical places. |
 |
|
When the mouse cursor hovers over an image field, the camera icon will appear. Change the image by clicking the camera icon and select a new image in the file browser. |
 |
|
When the mouse cursor hovers over a checkbox, the check icon will appear. Toggle the checkbox by clicking the check icon. |
 |
|
If a Gen Macro is assigned to the element, you will see a green die icon. Click the die icon to roll the macro. |
 |
Order of evaluation
- Roll dice. Insert results into macro.
- Replace keyword "this" with the value of the calling element.
- Replace any named elements from the sheet with their current value.
- Evaluate the statement as JavaScript.
Example: var a = 1d20 + StrAdj; if(a >= this && a > 9 || a >= 20) {true; } else{ false; }
- Roll 1d20 for 11.
var a = 11 + StrAdj; if(a >= this && a > 9 || a >= 20){ true; } else{ false; } - Assuming the element calling the roll has a value of 10.
var a = 11 + StrAdj; if(a >= 10 && a > 9 || a >= 20){ true; } else{ false; } - Replace StrAdj with the value from the sheet. Let's assume it's +1.
var a = 11 + 1; if(a >= 10 && a > 9 || a >= 20){ true; } else{ false; } - Evaluate as JavaScript.
var a = 12; if(a >= 10 && a > 9 || a >= 20){true;} else{false;}
if 12 >= 10 and 12 > 9 or 12 >= 20, then the result is true. Otherwise, the result is false
Success!
|
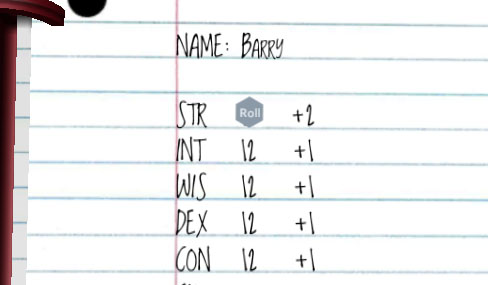
Gen Macros can be rolled when a character sheet is active (as indicated by the pencil cursor). Hover over the element to be rolled and click the green die icon. The current value of the element will be set to the die roll. For example, The Gen Macro for a STR attribute is set to 3d6. The Gen Macro is executed by press the die icon. The result of the roll, 12, is now written to the STR attribute. |
|
Gen Macros can also be specified that do not include a die roll. These macros will be evaluated when a change is made to the character sheet. For example, an element that is the average of two elements named STR and DEX would have the Gen Macro, STR + DEX / 2.
|
When a sheet is not active, hover over the sheet element with the Roll Macro attached. Click the blue die icon and the appropriate dice are rolled and the macro evaluated. For example, to roll 1d20 and compare the result to the element, the Roll Macro would be: 1d20 < this. |
 |
For example, to roll 1d20 and compare the result to the element, the Roll Macro would be: 1d20 < this.
Sample Macros
Roll 4d6 and drop the lowest:
var nums = [1d6, 1d6, 1d6, 1d6]; var total = 0; for(var i = 0; i < nums.length; i++) { total+=nums[i]; }; total - Math.min.apply( Math, nums);
Look up table that assigns a value based on another value, for example STR. In this example, the value of STR is assigned the variable stat. This allows the macro to be easily reused by assigning a different value to stat, e.g., var stat = DEX;
var stat = STR; if(stat<=1){-5;} else if(stat<4){-4;} else if(stat<6){-3;} else if(stat<8){-2;} else if(stat<10){-1;} else if(stat<12){0;} else if(stat<14){1;} else if(stat<16){2;} else if(stat<18){3;} else if(stat<20){4;} else{5;}
|
The Character Settings dialog can be shown by clicking the settings icon in the character panel. |
|
On the Miniature tab with the miniature type of figure set, you can select from a list of miniatures in the scroll view. To filter the view, type Keywords into the text field and press enter. For example, entering "fighter" would show all of the fighter miniatures. Similarly, entering "female" would show all of the female miniatures. Click on the miniature name to select it. You will see the preview appear in the window. To add attachments to a figure minatures, choose an Attach Position and an Attachment from the drop-down lists. For example, "Right hand" and "Great Sword." You should see the miniature with the attachment previewed in the window. Click the left and right arrows next to the miniature preview to cycle through any available skins. |
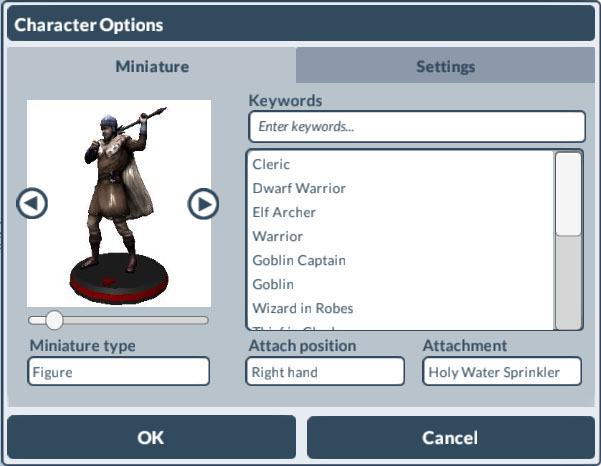 |
Use the slider below the preview image to rotate the miniature view.
Cardstock mini
|
On the Miniature tab with the minature type cardstock set, you can choose a custom image to use as the image on the cardstock pawn. The cardstock minature is the classic, cardboard pawn. |
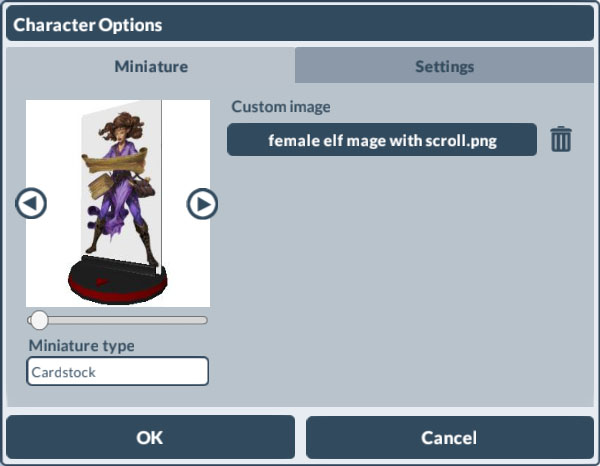 |
Use the slider below the preview image to rotate the miniature view.
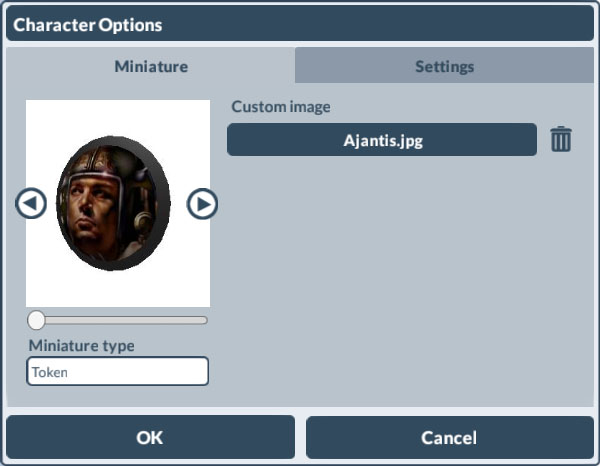
Token mini
|
On the Miniature tab with the minature type token set, you can choose a custom image to use as the image on the token. The token minature is the classic, pog style pawn. |
 |
Silhouette mini
|
On the Miniature tab with the silhouette type token set, you can choose a custom image to use as the image on a silhouette cardstock pawn. Use a PNG file with transparency for silhouette minis. The silhouette mini is a cut-out cardstock miniature. |
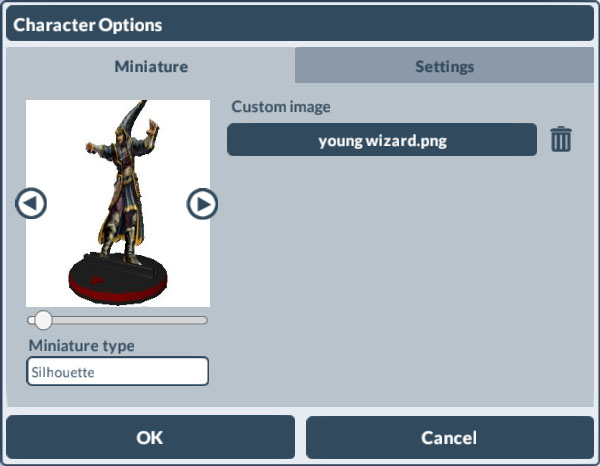 |
Use the slider below the preview image to rotate the miniature view.
|
On the Settings tab you can set a number of attributes for use on the map Character
Movement(ft.)
Visibility(ft.)
Light
|
 |
A player may only adjust the settings for their own character. The GM may adjust the settings for any character.
|
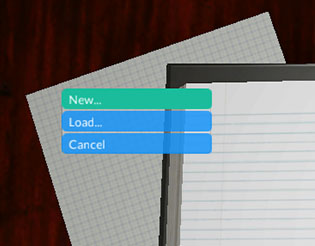
Click on the graph paper and select "New.." from the pop-up menu to create a new map. This will open the map options dialog. |
 |
|
In the Map Options dialog, enter a name for a map and set the height and width< in grid squares. The default scale is 5' per map square. If you would like to draw the map over an image (in JPEG or PNG format), click the Choose Background Image. The image size will be displayed below the button. If you would like the size of the map calculated automatically, check Calculate Map Size and set the size of the grid in pixels in the Grid Size box. If you don't know the grid size of the map, click the grid button next to the Grid Size field. Use the color swatches to set the Global and Ambient light to set the lighting for the map. |
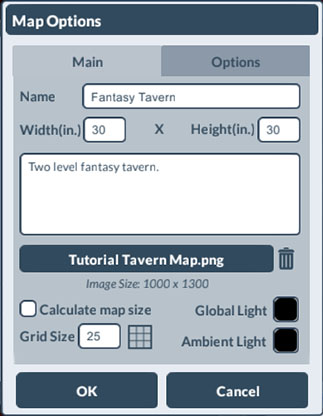 |
|
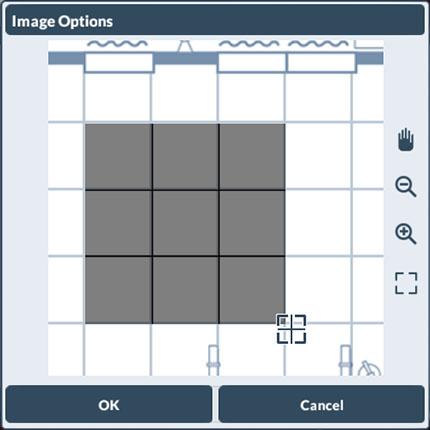
The grid button launches the Image Options dialog. Use the pan and zoom buttons on the right side to find a 3x3 grid on your map. Use the marquee button (on the bottom right) and drag and highlight the 3x3 grid. Press OK and the grid size will be automatically calculated. |
 |
When satisfied with your choices, press the OK button.
|
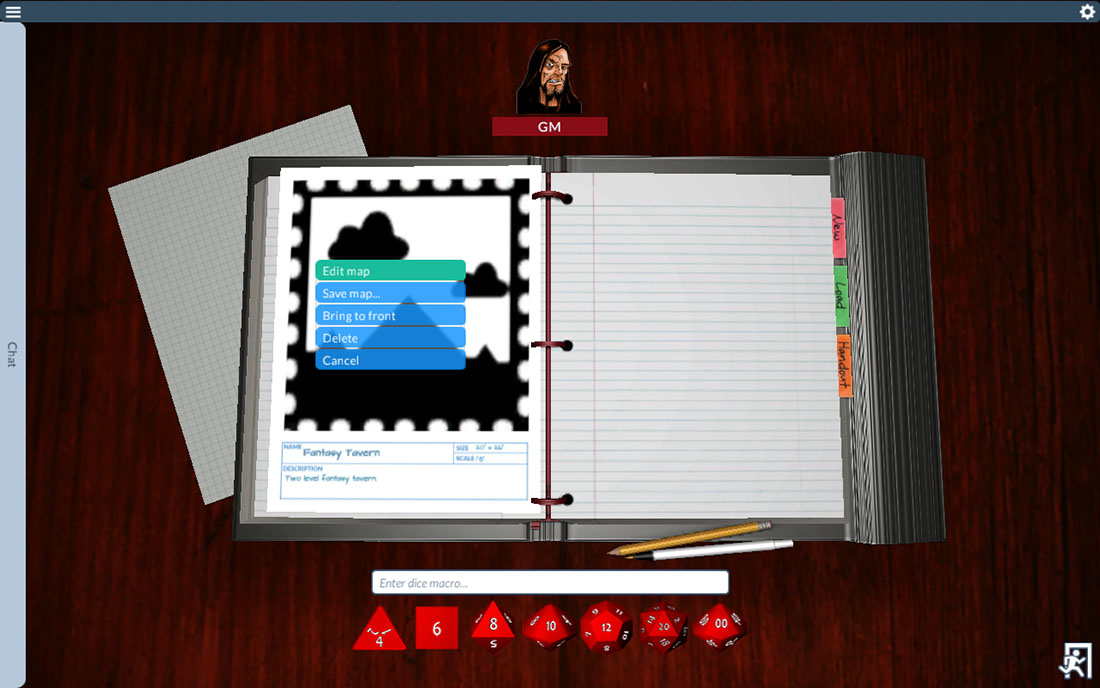
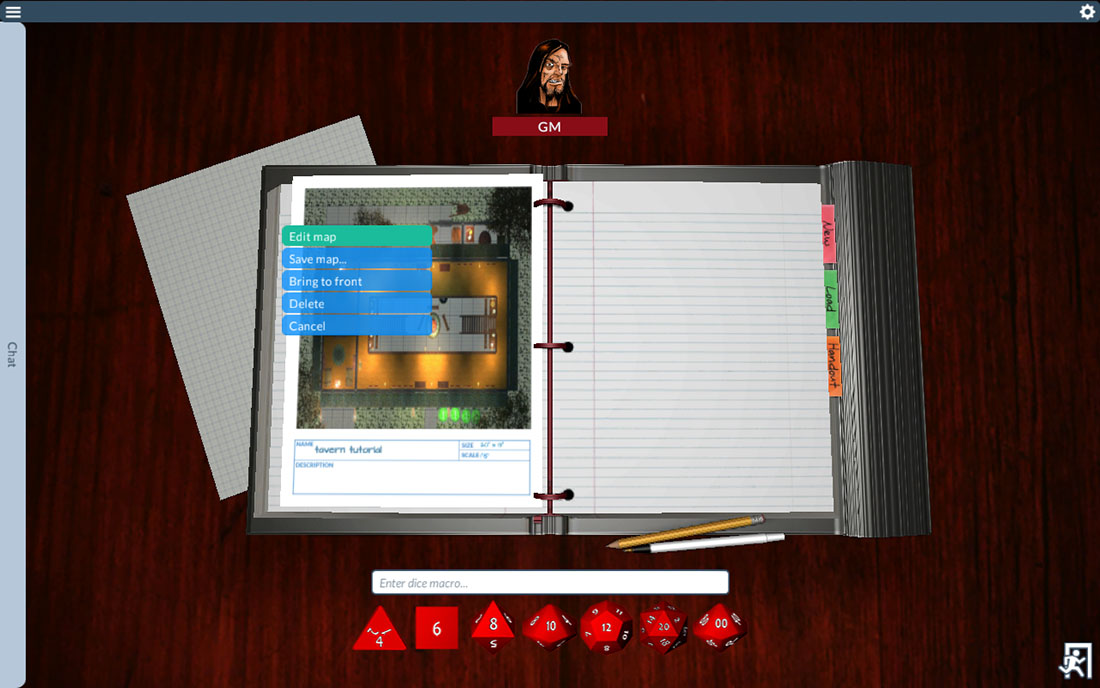
A page will be added to left size of the notebook for the map. On the bottom of the page, you'll see the name, description, and size of the map. Click on the map page to bring up the map menu. To edit the map, select edit map. To save a map, return to the tabletop and click-select "Save map..." |
 |
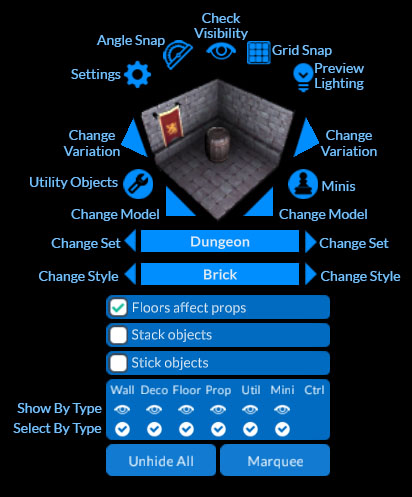
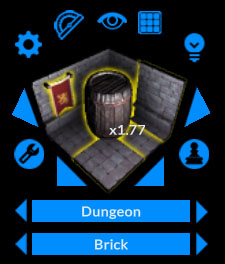
Map Editor UI
In the upper-right corner, you will see the map editing UI.
|
 |
|
To add objects to the map. Click the area in the UI representing what you would like to add. The object will be highlighted, indicating that it will be added to the map When active, props will be scaled to fit within the UI. The number shown is the scalar. To deselect an object to add, click on the area again. Pressing the ESC key will clear all editing types. |
 |
|
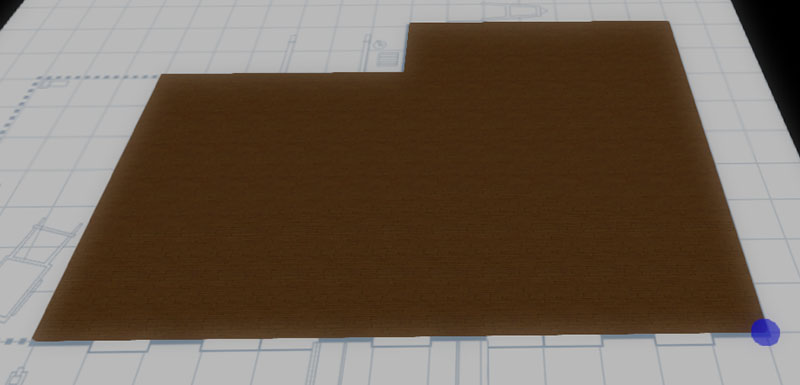
With just floor highlighted in the UI, left click on the map to begin defining a floor area. The blue line will indicate the current floor area. To end the current segment and begin another, left click on the map. To cancel adding floors, press ESC. |
|
To close the floor segment, double-click on the map or press ENTER. The beginning and end points do not have to meet. Closing a floor area will the join the beginning and end points. |
 |
Adding floors over existing floors—or moving a floor tile on top of another—with stack objects set in the UI, will place the floor tiles on top of the existing tiles.
|
With the wall highlighted in the UI, left click on the map to begin creating walls. As you move the mouse, the walls will be added to the map and a red line will indicate the wall segments. To end the current segment and begin another, left click on the map. To stop adding walls, double-click on the map, or press ENTER. To cancel adding the current segment, press ESC. |
 |
It is recommended that Grid Snap be used when adding walls and floors.
Add rooms to a map
With both the floor and wall highlighted in the UI, you can add walls and floors at the same time. When walls and floors are created simultaneously, the walls are added at the floor height.
If you are also adding decor to a room, creating the room counter-clockwise will add the decor to walls on the inside of the room. Creating the room clockwise will add decor to the outside of the room.
|
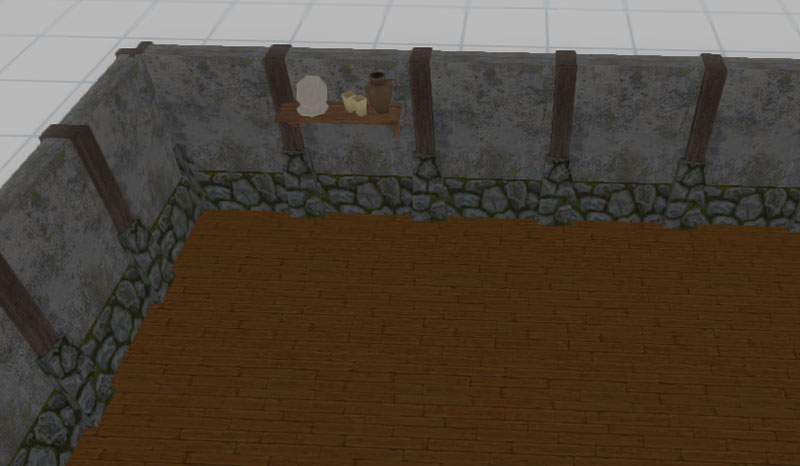
To add decor, highlight the decor in the UI. Decor must be placed on a wall. On the map, the decor will be displayed only when the mouse is over a wall. Click to add the decor. By highlighting the decor and the wall in the UI, you can add both at the same time. |
 |
|
To add props, highlight the prop in the UI. When a props is active in the UI, it is scaled to fit the UI. The number displayed is the preview scalar. Hover the mouse over the prop to see a description. Click on the to add the prop. |
 |
|
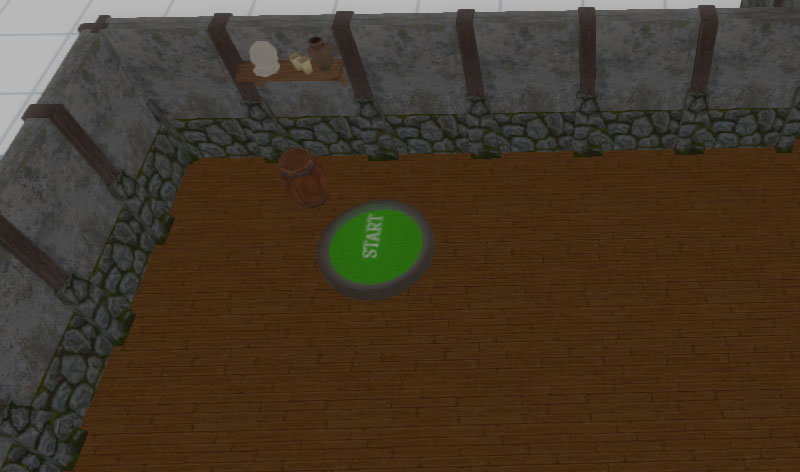
Click the Utilties button to enter utility editing mode. Use the Utilities edit mode to add start points to the map. Start points are the grid squares where players will be added when a map is loaded. Click on the map to add the start point. A start point will added to that square. |
 |
Click the Minis button to enter the miniatures editing mode.
Clicking the Mini button with display the miniature selection dialog (see “Choosing Miniatures”).
With a miniature chosen, click on a map square to add the mini.
Editing objects
|
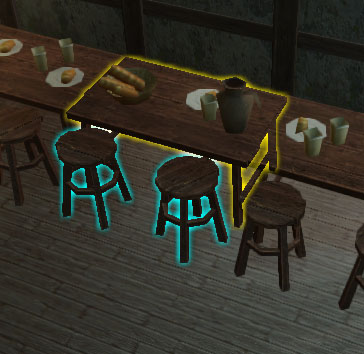
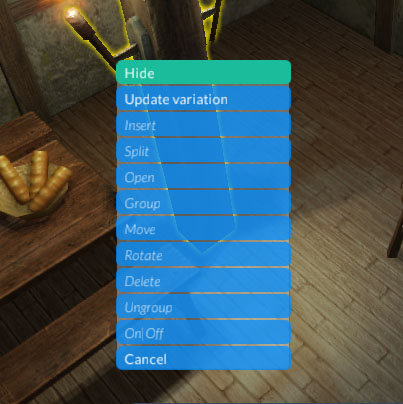
Deselect all highlighted objects in the UI, or press ESC. You may interact with a single object by clicking and revealing the pop-up menu. To select multiple objects, hold the SHIFT key when clicking on the objects. Click on the last object in the selection with the SHIFT key held to reveal the pop-up menu. |
 |
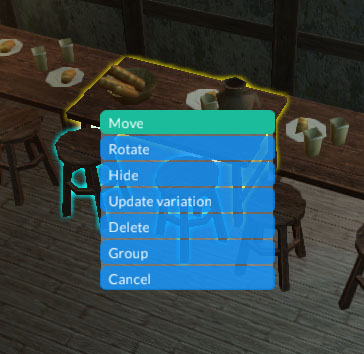
|
The pop-up menu will reveal the options available for the selection. Options that are available only for some objects in the selection will appear in italics. You may cancel the menu by selecting cancel, or by moving the mouse off of the menu. |
 |
|
If you select move, a move gizmo will appear at the bottom center of the selection. To move the selection, click and drag on an arrowhead of the gizmo and movement will be contrained to that axis. Clicking and dragging the bottom center of the gizmo will move the object laterally on the x and z axes. |
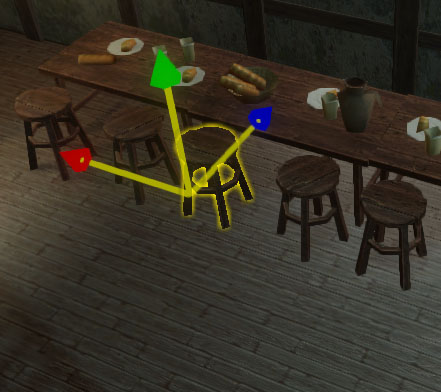 |
|
If you select rotate, a rotate gizmo will appear at the bottom center of the selection. Three rotation axes are displayed. |
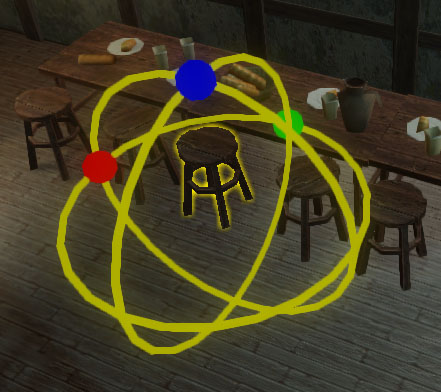 |
|
Move the mouse cursor over one of the rotation handles to see that axis in isolation. To rotate, click and drag on the rotation handle. |
Depending on the objects selected, the options in the pop-up menu will vary.
|
 |
To save a map press CTRL+S in the map view.
You may also save a map from the tabletop. Click on the map sheet on the tabletop and choose save in the pop-up menu. Use this option if you want to save the map using a different name.
|
Click on the graph paper and select Load... from the pop-up menu to create a load map. Choose the map in the file browser and a map page will be loaded onto the tabletop. |
 |
|
Click on the map page and select Edit map from the pop-up menu. The map will be loaded and you will be switched to the map view. |
 |
Click on the map page and select Delete from the pop-up menu. The map will be removed from the tabletop.
|
When connected to a session, the Share to tabletop option will be available in the map pop-up menu. Select this option to share the map with the players in the session. The map will be sent to the players and their minis will be added at the available start points You will be switched to the map view. |
 |
|
To return to the tabletop from the map view. Click on the exit button in lower-right corner. To return to the map, click on the mini button in any of the character panels. The will switch to the map view and center the view on that mini. Alternately, you can select Edit map... from the map pop-up menu and you be switched back to the map. |
|
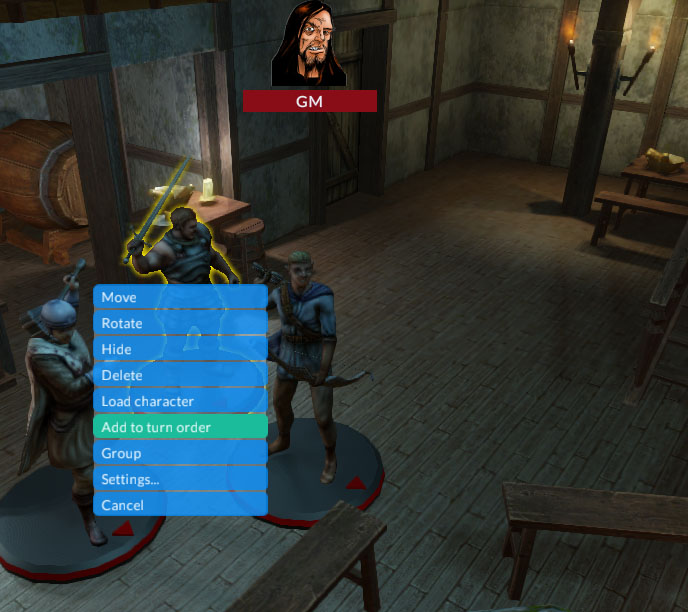
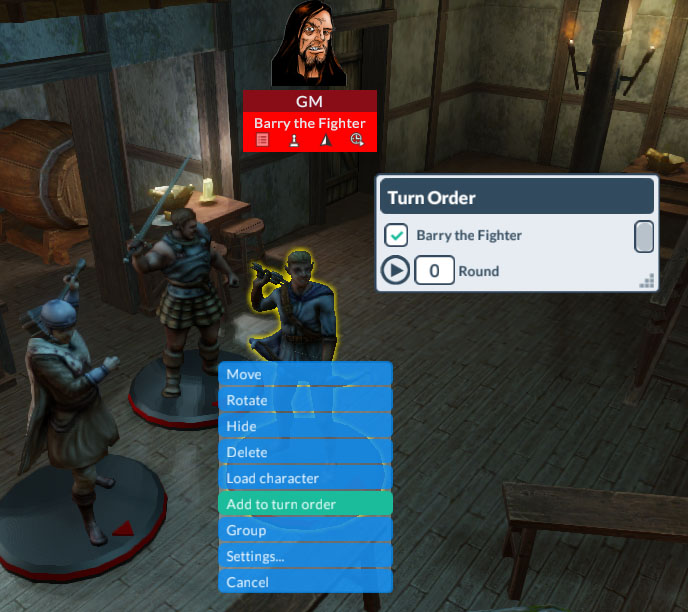
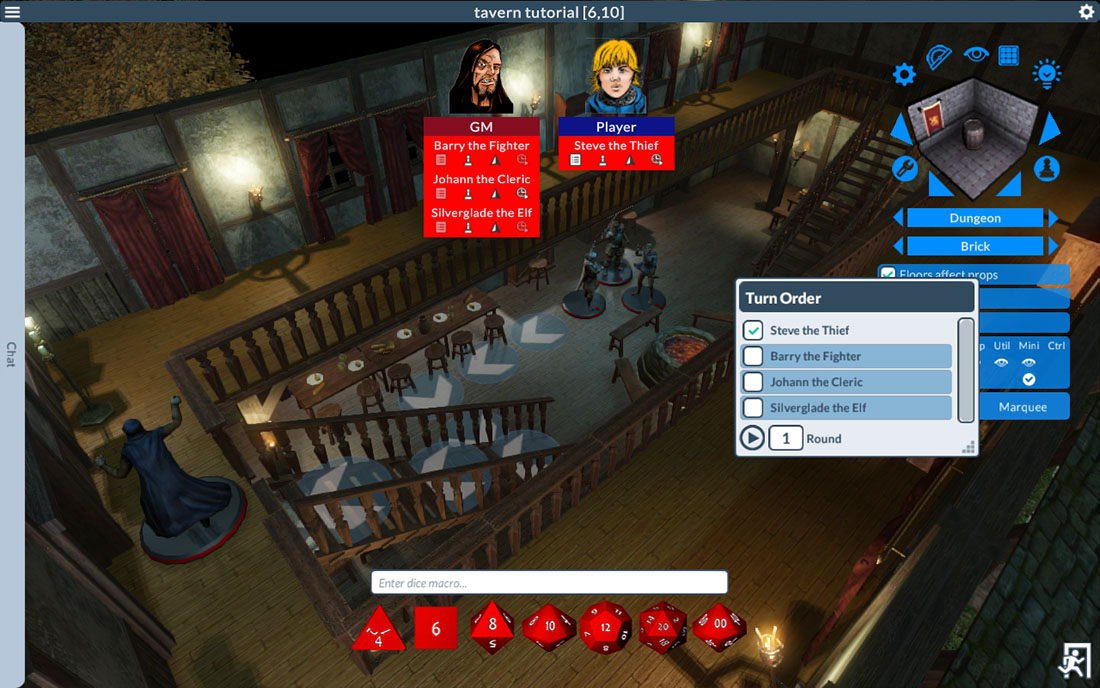
To add a character to the turn order, click on the mini and select Add to turn order. |
 |
|
When an NPC mini is added to the turn order, a character entry is added to the GM. When the first character is added to the turn order, the turn order window is opened and the character is added. The checkbox indicates which turn is active. The checkbox can be set manually. A round number is displayed at the bottom of the turn order. To set the round number, just edit the value. The forward button increments the turn to the next character in the order. When the last character in the order is active and the forward button is pressed, the round number is increased by one. Hover the mouse over the entry in the turn order and the character's mini will be highlighted. Click on an entry in the turn order and the view will be moved to the character's mini. To add additional characters, click on their miniature and select Add to turn order. To reorder, click and drag an entry to the desired location in the turn order. To remove a character from the turn order, click on the miniature and select Remove from turn order. When all characters have been removed from the turn order, the window will be hidden. |
 |
|
When the map shared, the GM will be able to see the entire map. |
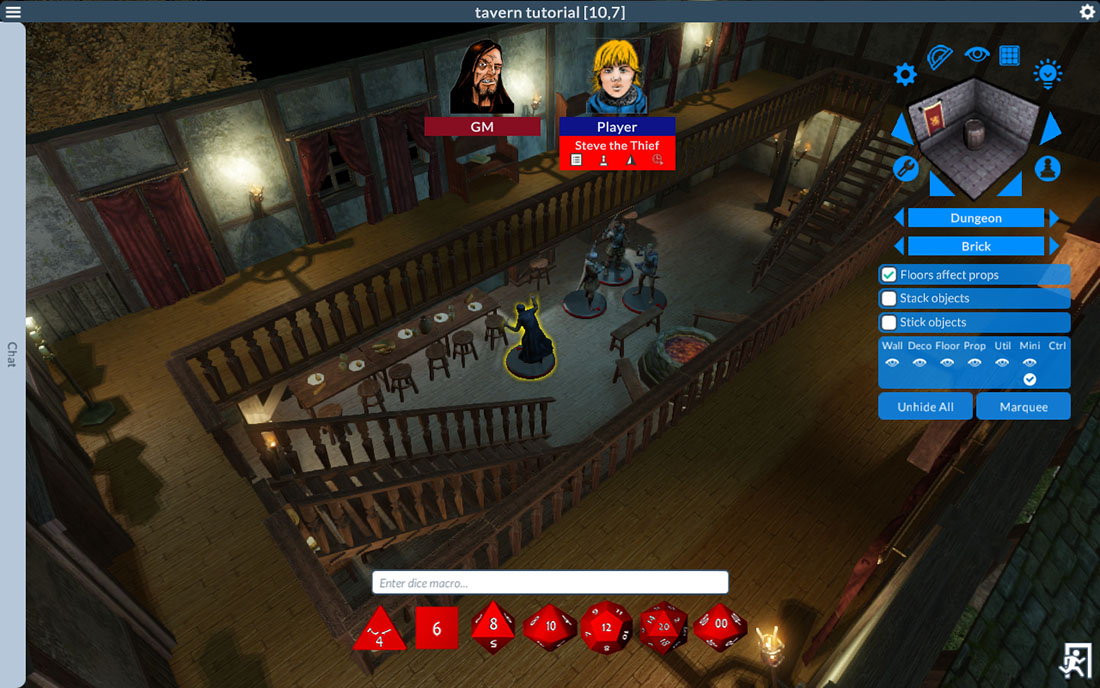 |
|
The player will see only the portions of the map visible to the character. When the turn order is not active, player movement is not restricted, but the visibility will not be updated when player moves the miniature. If the GM moves a miniature, regardless of the turn order, the player visibility will be updated when the miniature is dropped. A player may only move miniatures belonging to their characters. |
 |
|
When the player moves their miniature on their turn, the move cost is displayed on the map. The costs are colored to represent the movement type. Green is walk, yellow is charge, and red is run. When the move is completed, the remaining move available is adjusted. Arrows are shown on the map representing the shortest path for the miniature to reach the destination. |
 |
|
The movement arrows are visible to the GM and other players. |
 |
|
When the player completes their move, the visibility for the miniature is updated. The player may end their turn by clicking on the end turn button (the last button) in the character bar. |
 |
Click the Exit button in the lower-right corner to return to the tabletop.
Keyboard and Mouse Quick Reference
Orbit - ALT (Option) + mouse or right-mouse button
Move - SPACEBAR + mouse or middle-mouse button
Zoom - CTRL (Control) + mouse or Mouse wheel
Edit Sheet - Click the pen, or press P.
Quit Edit - Click the pen, or press ESC.
Edit Character - Hover over the element to change.
Sheet Menu - Click on the sheet: Settings, Save sheet..., Save character..., Delete.
Move Sheet - Click on the sheet and move mouse. Release mouse to drop.
Map menu - Click on the graph paper: New..., Load...
Map edit menu - Click on the map page: Edit Map, Save Map, Share to tabletop..., Delete.
Cancel active operation or mode - ESC
Close floors/end wall segment - Enter
Edit existing walls - CTRL + W
Undo object transform - U
Toggle Grid - CTRL + G
- Nudge 2D Map one pixel (in grid mode) - Arrow keys
- Nudge 2D Map 1 scale foot (in grid mode) - Shift|Arrow keys
- Raise/lower construction plane (single wall height) - Shift|+/- keys
- Raise/lower construction plane (1/5 floor height) - Control|+/- keys